How To Replace Front CV Joint Axle Repair Install Remove Wheel Drive Boot
this tutorial will show you how to replace a front cv joint axle for you car or truck i show you how to replace the axle with step by step images, the pictures i took myself while i worked on a live vehicle and remove the front axles give you directions [1620], Last Updated: Sat May 18, 2024
zcar
Mon Oct 09, 2006
29 Comments
45584 Visits
About a month ago, I noticed some great all over the inside of the wheel Fender Wells. At first I though I had ran over some grease or something since there was some construction near my work.
Then about two weeks ago, I took a trip to the local bakery. When I was coming out of the bakery store, I looked to the wheel of my 1998 Nissan Pathfinder. I noticed that the axle boot was torned. I kneel down to take a secon look, and sure enough, the cv joint axle boot was broken, and in the process, letting all the grease out and spilling it out all over the inner fenders.
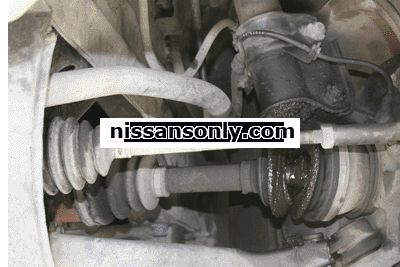
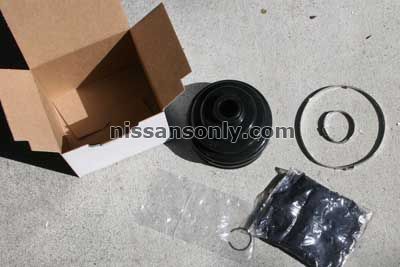
At first, my plan was to only replace the broken rubber boot since the axle itself was in good condition. I went to the local auto parts store and bout a boot cover for only $10 dollars. I figure It would be cheaper to buy a $10 dollar rubber boot than to replace the whole axle.
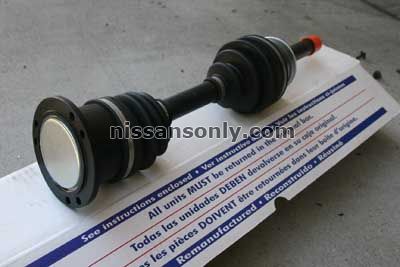
As I started to get more into, I realize that it was not going to be possible to just replace the rubber boot cover. It was coo complicated. So i dedcided to replace the whole cv joint axle instead. I went to the local auto parts store at Kragens and bought a rebuilt axle for $79 dollars (not bad, i thought it was going to cost me like $179 dollars)
So here are the steps to replace the CV Joint Axle on my 4x4 Nissan Pathfinder. I spent the whole weekend on this project. I think it took me so much time because I didn't have a repair manual and I couldn't find any tutorial or guide on the internet that would show an online howto. That's why im now writing one so if there is anyone out there in my shoes they will have some information on how to perform this job. So here we go..
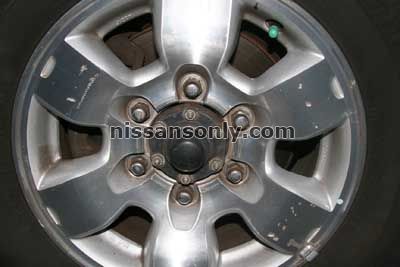
Remove wheel (ofcourse)
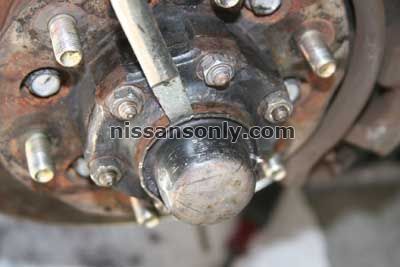
Remove Sub Hub Cover - You are going to have to use a pry bar or a strong flat screwdriver to pry out this cover. I used a hammer and a thin screw driver to start and then used this wheel lug remover to pry out this little sucker. This is hard to remove, so use patience, otherwise, you are going to ruin it and you are going to have to replace it with a new one and only the dealer sale these. So be careful not to damage it.
Remove Snap Ring - Using a snap ring plyers, remove the snap ring

Remove Sub Hub Assembly - Now that you have the sub hub cover removed and the snap ring, its time to remove the Sub Hub Assemply. You will need a 13mm socket to remove all six nuts.
Remove the two screws - To release the lock washer holding the wheel bearing lock nut, you will need to remove the two scres holding this lock waher. This is very simple to do, JUST MAKE SURE YOU USE THE PROPPER SIZE OF SCREW DRIVER. too small or too large screwdriver can damage the crew heads and then you won't be able to remove them. So use the correct size, otherwise, you run the risk of ruiining the screws.

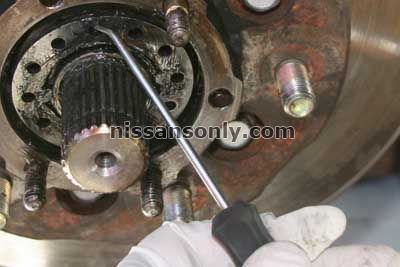
Remove lock Washer - To remove the Lock Washer after removing both screws, I used a pick tool to remove it. Using a pick tool is the easies way to get it out. but you can use whatever works for you.
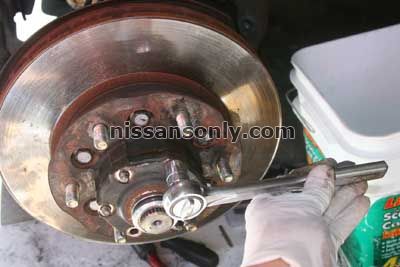
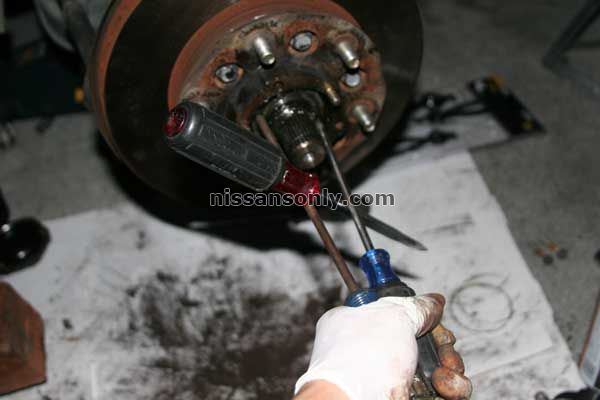
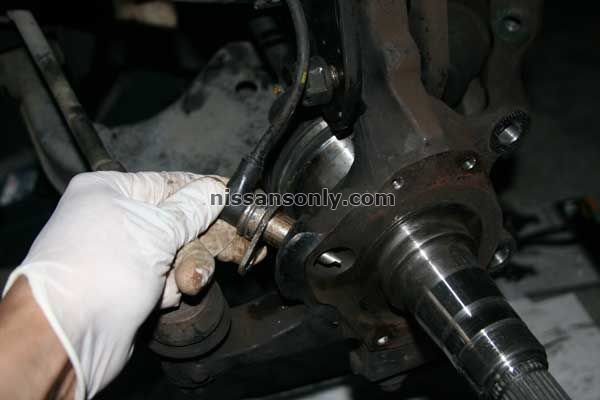
Remove Wheel Bearing Lock Nut - To remove the wheel bearing lock nut, I use three long screw drivers. Two I put on the two holes on the nut and one to turn the other two screwdrivers. Like in the picture below:
Remove Brake Caliper - Now Remove the break caliper. This is held by two big bolts. You will need to use some muscle for these two guys. If you have an impact gun, its much easier. The two bold are found behind the caliper.
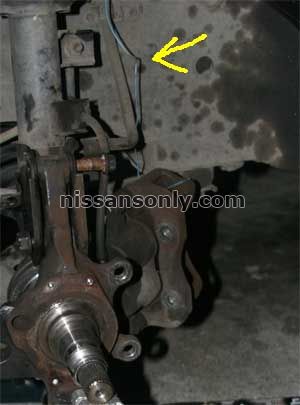
To avoid any damage to the brake hose, I strongly recommend that you use a piece of hanger wire or a strong string to hang the caliper, this will avoid putting any pressure/stress on the brake hose iftsel. See illustration below:
Next, remove the wheel bearing and rotor from knukle. (no image)
Remove Dust Cover - Now remove the brake dust cover by removing the four screws holding it to the knuckle.
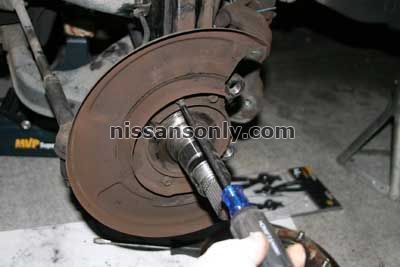
Remove ABS Sensor -Once you have removed the Rotor, you will see the ABS Sensor. I removed the sensor, I don't think its necessary, but I removed it just to be safe so i wouldn't damage it. If you decide to remove it, make sure you use some kind of spray lubricant to remove it, it will be stuck pretty hard in there.
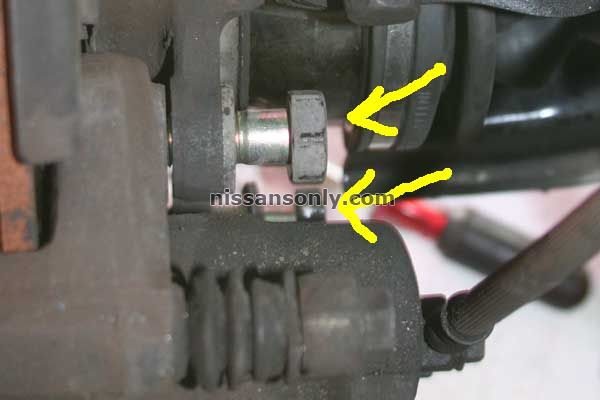
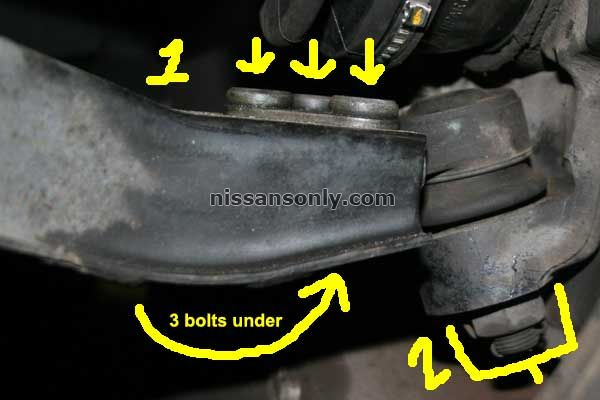
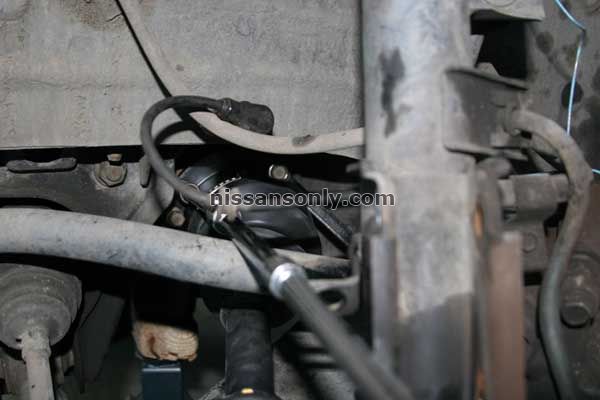
Knuckle Ball Joint Removal - I have to say, this is the harderst part to remove for me. Here I had to choices.
1. Remove the three lower balljoint-to-lower link bolts (1 in the picture)
2. remove the big Ball Jointbig bolt in the. (2 in the Picture)
I went with option 1, it was the easiest for me to do since i didn't have power tools.
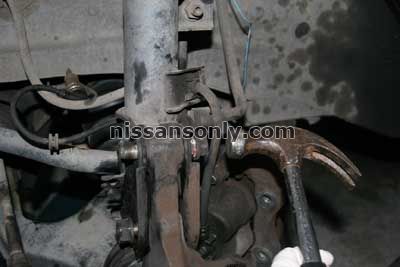
Strut Bar Bolts - Now its time to remove the two big bolts holding the strut with the knuckle. These two bolts are tough to remove, I used lubricant to loosen up all the rust. Once I was able to remove the nut, I hammered it out.
Remove CV Joint - Now to remove the CV Joint Axle from the Knuckle arm, you will need to turn the wheels toward the passenger side to allow you to easily remove the axle from the kuncle.
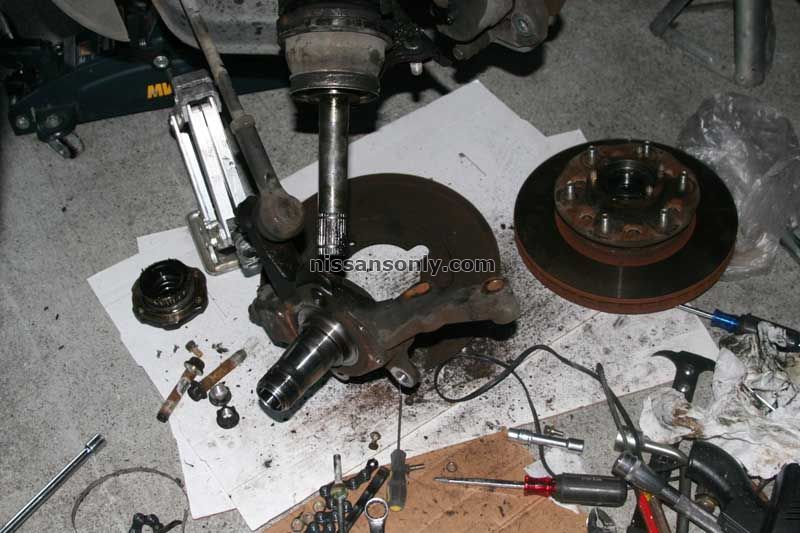
Finally - The last step into removing this sucker. Unbolt the six bolts holding the axle on the front differential.
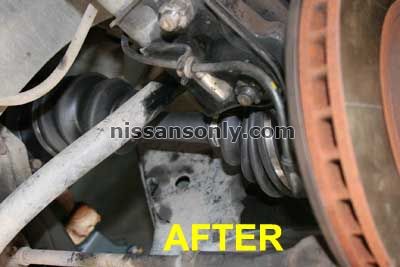
To Install - Just do the reverse with the new CV Joint.
Done.
I am Mister Z, I love Cars, specially Nissans. Your Comments Are Welcome.
Hope this guide helped you. While I don't pretent to be an expert, I do want to help those who are looking for help. I love working on cars, and its my passion in sharing my knowledge to others.
Courtesy: http://www.nissansonly.com/replacing-front-cv-joint-axle-4x4-differential-boot-remove-install-fix-t46.html
Then about two weeks ago, I took a trip to the local bakery. When I was coming out of the bakery store, I looked to the wheel of my 1998 Nissan Pathfinder. I noticed that the axle boot was torned. I kneel down to take a secon look, and sure enough, the cv joint axle boot was broken, and in the process, letting all the grease out and spilling it out all over the inner fenders.
At first, my plan was to only replace the broken rubber boot since the axle itself was in good condition. I went to the local auto parts store and bout a boot cover for only $10 dollars. I figure It would be cheaper to buy a $10 dollar rubber boot than to replace the whole axle.
As I started to get more into, I realize that it was not going to be possible to just replace the rubber boot cover. It was coo complicated. So i dedcided to replace the whole cv joint axle instead. I went to the local auto parts store at Kragens and bought a rebuilt axle for $79 dollars (not bad, i thought it was going to cost me like $179 dollars)
So here are the steps to replace the CV Joint Axle on my 4x4 Nissan Pathfinder. I spent the whole weekend on this project. I think it took me so much time because I didn't have a repair manual and I couldn't find any tutorial or guide on the internet that would show an online howto. That's why im now writing one so if there is anyone out there in my shoes they will have some information on how to perform this job. So here we go..
Remove wheel (ofcourse)
Remove Sub Hub Cover - You are going to have to use a pry bar or a strong flat screwdriver to pry out this cover. I used a hammer and a thin screw driver to start and then used this wheel lug remover to pry out this little sucker. This is hard to remove, so use patience, otherwise, you are going to ruin it and you are going to have to replace it with a new one and only the dealer sale these. So be careful not to damage it.
Remove Snap Ring - Using a snap ring plyers, remove the snap ring
Remove Sub Hub Assembly - Now that you have the sub hub cover removed and the snap ring, its time to remove the Sub Hub Assemply. You will need a 13mm socket to remove all six nuts.
Remove the two screws - To release the lock washer holding the wheel bearing lock nut, you will need to remove the two scres holding this lock waher. This is very simple to do, JUST MAKE SURE YOU USE THE PROPPER SIZE OF SCREW DRIVER. too small or too large screwdriver can damage the crew heads and then you won't be able to remove them. So use the correct size, otherwise, you run the risk of ruiining the screws.
Remove lock Washer - To remove the Lock Washer after removing both screws, I used a pick tool to remove it. Using a pick tool is the easies way to get it out. but you can use whatever works for you.
Remove Wheel Bearing Lock Nut - To remove the wheel bearing lock nut, I use three long screw drivers. Two I put on the two holes on the nut and one to turn the other two screwdrivers. Like in the picture below:
Remove Brake Caliper - Now Remove the break caliper. This is held by two big bolts. You will need to use some muscle for these two guys. If you have an impact gun, its much easier. The two bold are found behind the caliper.
To avoid any damage to the brake hose, I strongly recommend that you use a piece of hanger wire or a strong string to hang the caliper, this will avoid putting any pressure/stress on the brake hose iftsel. See illustration below:
Next, remove the wheel bearing and rotor from knukle. (no image)
Remove Dust Cover - Now remove the brake dust cover by removing the four screws holding it to the knuckle.
Remove ABS Sensor -Once you have removed the Rotor, you will see the ABS Sensor. I removed the sensor, I don't think its necessary, but I removed it just to be safe so i wouldn't damage it. If you decide to remove it, make sure you use some kind of spray lubricant to remove it, it will be stuck pretty hard in there.
Knuckle Ball Joint Removal - I have to say, this is the harderst part to remove for me. Here I had to choices.
1. Remove the three lower balljoint-to-lower link bolts (1 in the picture)
2. remove the big Ball Jointbig bolt in the. (2 in the Picture)
I went with option 1, it was the easiest for me to do since i didn't have power tools.
Strut Bar Bolts - Now its time to remove the two big bolts holding the strut with the knuckle. These two bolts are tough to remove, I used lubricant to loosen up all the rust. Once I was able to remove the nut, I hammered it out.
Remove CV Joint - Now to remove the CV Joint Axle from the Knuckle arm, you will need to turn the wheels toward the passenger side to allow you to easily remove the axle from the kuncle.
Finally - The last step into removing this sucker. Unbolt the six bolts holding the axle on the front differential.
To Install - Just do the reverse with the new CV Joint.
Done.
I am Mister Z, I love Cars, specially Nissans. Your Comments Are Welcome.
Hope this guide helped you. While I don't pretent to be an expert, I do want to help those who are looking for help. I love working on cars, and its my passion in sharing my knowledge to others.
Courtesy: http://www.nissansonly.com/replacing-front-cv-joint-axle-4x4-differential-boot-remove-install-fix-t46.html
pops
Mon Jan 14, 2008
thank you, i'm taking it to a shop
david
Tue Mar 03, 2009
i have a 1998 saturn sl2 . wondering if it is the same procedure to change the axle as with the nissan.sure could use some advice. defrosch at att.net
craig (Australia)
Fri Jul 05, 2019
i have a 2000 n50 pathfinder, i replaced a cv shaft recently during the change out i did not find a thrust washer fitted to the old shaft is this normal or should there have been one tia
craig
craig
anthony
Mon Mar 19, 2018
can't seem to remove bearing please help
anthony
Mon Mar 19, 2018
i have a 2000 exterra after removing the rotor, the bearings are still on the axle and can't figure out how to remove this is the part that you have no pic of please help
https://www.wallpaperama.com/forums/how-to-replace-front-cv-joint-axle-repair-install-remove-wheel-drive-boot-t442.html
https://www.wallpaperama.com/forums/how-to-replace-front-cv-joint-axle-repair-install-remove-wheel-drive-boot-t442.html