How To Configure Linux Console Terminal Serial Ports UNIX Hyper-Terminal
This Page Contains information about How To Configure Linux Console Terminal Serial Ports UNIX Hyper-Terminal By unix in category Linux Systems with 10 Replies. [2876], Last Updated: Sat May 18, 2024
unix
Tue Nov 21, 2006
10 Comments
14412 Visits
 As you may or may not know, UNIX is a command line operating system. Most administrators (like me) have to use the shell on Linux/UNIX systems because they don't have a nice and pretty GUI (Graphical User Interface) A gui is something like windown. A command line doesn't have all the images, instead it only has a prompt, letters and numbers..
How to Configure Linux Console:
Follow these steps to configure the linux machine,box, server,computer or whatever you call it.
Step 1. MAKE BACKUP - You will need to make a backup copy of your inittab, so to do this, send this command.
CODE:
cp /etc/inittab /etc/inittab.org
Step 2. CHECK SERIAL PORTS ARE ENABLED: Send this comands to check you have console ports in your motherboard:
CODE:
dmesg | grep tty
You will see something like this:
CODE:
ttyS0 at I/O 0x3f8 (irq = 4) is a 16550A
ttyS1 at I/O 0x2f8 (irq = 3) is a 16550A
ttyS1 at I/O 0x2f8 (irq = 3) is a 16550A
Now send this command:
CODE:
setserial -g /dev/ttyS[01]
You should see somthing like this:
CODE:
/dev/ttyS0, UART: 16550A, Port: 0x03f8, IRQ: 4
/dev/ttyS1, UART: 16550A, Port: 0x02f8, IRQ: 3
/dev/ttyS1, UART: 16550A, Port: 0x02f8, IRQ: 3
NOTE: Sometimes you will need to enable the serial port in your mother baord by going into the BIOS.
Step 3. EDIT INITTAB FILE - To edit the inittab file, execute this command:
CODE:
nano /etc/inittab
NOTE: For my example i used the nano text editor, you can use whatever text editor you prefer, like VI Editor.The inittab file should look something like this:
CODE:
#
# inittab This file describes how the INIT process should set up
# the system in a certain run-level.
#
# Author: Miquel van Smoorenburg, <[email protected]>
# Modified for RHS Linux by Marc Ewing and Donnie Barnes
#
# Default runlevel. The runlevels used by RHS are:
# 0 - halt (Do NOT set initdefault to this)
# 1 - Single user mode
# 2 - Multiuser, without NFS (The same as 3, if you do not have networking)
# 3 - Full multiuser mode
# 4 - unused
# 5 - X11
# 6 - reboot (Do NOT set initdefault to this)
#
id:3:initdefault:
# System initialization.
si::sysinit:/etc/rc.d/rc.sysinit
l0:0:wait:/etc/rc.d/rc 0
l1:1:wait:/etc/rc.d/rc 1
l2:2:wait:/etc/rc.d/rc 2
l3:3:wait:/etc/rc.d/rc 3
l4:4:wait:/etc/rc.d/rc 4
l5:5:wait:/etc/rc.d/rc 5
l6:6:wait:/etc/rc.d/rc 6
# Trap CTRL-ALT-DELETE
ca::ctrlaltdel:/sbin/shutdown -t3 -r now
# When our UPS tells us power has failed, assume we have a few minutes
# of power left. Schedule a shutdown for 2 minutes from now.
# This does, of course, assume you have powerd installed and your
# UPS connected and working correctly.
pf::powerfail:/sbin/shutdown -f -h +2 "Power Failure; System Shutting Down"
# If power was restored before the shutdown kicked in, cancel it.
pr:12345:powerokwait:/sbin/shutdown -c "Power Restored; Shutdown Cancelled"
# Run gettys in standard runlevels
1:2345:respawn:/sbin/mingetty tty1
2:2345:respawn:/sbin/mingetty tty2
3:2345:respawn:/sbin/mingetty tty3
4:2345:respawn:/sbin/mingetty tty4
5:2345:respawn:/sbin/mingetty tty5
6:2345:respawn:/sbin/mingetty tty6
# Run xdm in runlevel 5
x:5:once:/etc/X11/prefdm -nodaemon
Search for the line where it says: 6:2345:respawn:/sbin/mingetty tty6 and add these line:
CODE:
# Run agetty on COM1/ttyS0 and COM2/ttyS1
s0:2345:respawn:/sbin/agetty -L -f /etc/issueserial 9600 ttyS0 vt100
s1:2345:respawn:/sbin/agetty -L -f /etc/issueserial 38400 ttyS1 vt100
#s1:2345:respawn:/sbin/agetty -L -i 38400 ttyS1 vt100
s0:2345:respawn:/sbin/agetty -L -f /etc/issueserial 9600 ttyS0 vt100
s1:2345:respawn:/sbin/agetty -L -f /etc/issueserial 38400 ttyS1 vt100
#s1:2345:respawn:/sbin/agetty -L -i 38400 ttyS1 vt100
so now your inittab file should look like this:
CODE:
#
# inittab This file describes how the INIT process should set up
# the system in a certain run-level.
#
# Author: Miquel van Smoorenburg, <[email protected]>
# Modified for RHS Linux by Marc Ewing and Donnie Barnes
#
# Default runlevel. The runlevels used by RHS are:
# 0 - halt (Do NOT set initdefault to this)
# 1 - Single user mode
# 2 - Multiuser, without NFS (The same as 3, if you do not have networking)
# 3 - Full multiuser mode
# 4 - unused
# 5 - X11
# 6 - reboot (Do NOT set initdefault to this)
#
id:3:initdefault:
# System initialization.
si::sysinit:/etc/rc.d/rc.sysinit
l0:0:wait:/etc/rc.d/rc 0
l1:1:wait:/etc/rc.d/rc 1
l2:2:wait:/etc/rc.d/rc 2
l3:3:wait:/etc/rc.d/rc 3
l4:4:wait:/etc/rc.d/rc 4
l5:5:wait:/etc/rc.d/rc 5
l6:6:wait:/etc/rc.d/rc 6
# Trap CTRL-ALT-DELETE
ca::ctrlaltdel:/sbin/shutdown -t3 -r now
# When our UPS tells us power has failed, assume we have a few minutes
# of power left. Schedule a shutdown for 2 minutes from now.
# This does, of course, assume you have powerd installed and your
# UPS connected and working correctly.
pf::powerfail:/sbin/shutdown -f -h +2 "Power Failure; System Shutting Down"
# If power was restored before the shutdown kicked in, cancel it.
pr:12345:powerokwait:/sbin/shutdown -c "Power Restored; Shutdown Cancelled"
# Run gettys in standard runlevels
1:2345:respawn:/sbin/mingetty tty1
2:2345:respawn:/sbin/mingetty tty2
3:2345:respawn:/sbin/mingetty tty3
4:2345:respawn:/sbin/mingetty tty4
5:2345:respawn:/sbin/mingetty tty5
6:2345:respawn:/sbin/mingetty tty6
# Run agetty on COM1/ttyS0 and COM2/ttyS1
s0:2345:respawn:/sbin/agetty -L -f /etc/issueserial 9600 ttyS0 vt100
s1:2345:respawn:/sbin/agetty -L -f /etc/issueserial 38400 ttyS1 vt100
#s1:2345:respawn:/sbin/agetty -L -i 38400 ttyS1 vt100
# Run xdm in runlevel 5
x:5:once:/etc/X11/prefdm -nodaemon
Step 4. ACTIVATE NEW CHANGES - to active the new changes, send this command:
CODE:
init q
Step 5. CONFIRM agetty IS LISTENING TO PORTS: send this command to confirm:
CODE:
ps -ef | grep agetty
The output should look like this:
CODE:
[root@ns3 ~]# ps -ef | grep agetty
root 3526 1 0 09:27 ttyS1 00:00:00 /sbin/agetty -L -f /etc/issueserial 38400 ttyS1 vt100
root 5337 3762 0 10:23 pts/0 00:00:00 grep agetty
root 3526 1 0 09:27 ttyS1 00:00:00 /sbin/agetty -L -f /etc/issueserial 38400 ttyS1 vt100
root 5337 3762 0 10:23 pts/0 00:00:00 grep agetty
Step 6. HOW TO CONNECT FROM PC TO SERVER CONSOLE: Now comes the good part, connecting to your console ports. Now that they have been enabled, you can connect to them. These are the parts (items) things you are going to need to connect:
1 roll-over cable
2 db-9 connectors

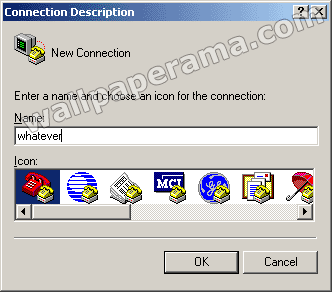
Step 7 - EMULATOR - for this tutorial guide, i will be using windows Hyper-Terminal. These are the step to take to start they hyper-terminal:
Give your connection a name, you can name it whatever you want:

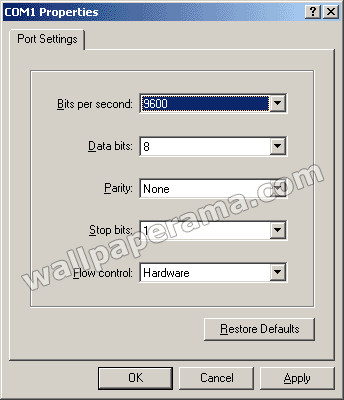
Select the COM connection, in my exaple i am using COM1

Make sure to use these setting: 9600 8-N-1

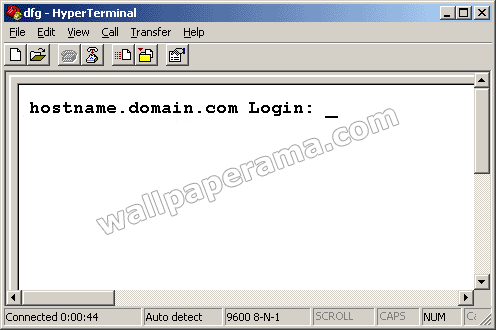
Now you should be connected to the Shell

DONE
credit To Van Emery : http://www.vanemery.com/Linux/Serial/serial-console.html
lunar95s
Tue Feb 10, 2009
where can i buy that type of cable i went to best buy and circuit city and they told me they dont cary thos types of cables. what are they called?
hiper
Sun Sep 28, 2008
thank you, i always want to learn how to connect to linux console using hyperterminal
Dale
Wed Sep 10, 2008
started out to be a good tutorial, but is left hanging in space by finishing in windows. i think you need to learn how to do things before you try to teach someone else.
buddy
Mon Jul 21, 2008
good information..................thanks
sanwin
Thu Apr 17, 2008
testaaaaaaaaaaaaaaaaaaaaaaaaaaaaaaa
https://www.wallpaperama.com/forums/how-to-configure-linux-console-terminal-serial-ports-unix-hyper-terminal-t489.html
https://www.wallpaperama.com/forums/how-to-configure-linux-console-terminal-serial-ports-unix-hyper-terminal-t489.html